Getting started
The SDK works on many platforms and comes with support for many programming languages. Please check the previous section for more information on how to use the sample applications.
Adding the SDK to your project
The Github repository contains binaries for Android, iOS, Raspberry Pi, Windows and Linux. The next sections explain how to add the SDK to an existing project.
Android
The SDK is distributed as an Android Studio module and you can add it as reference or you can also build it and add the AAR to your project. But, the easiest way to add the SDK to your project is by directly including the source. In your build.gradle file add:
android {

 # This is the block to add within "android { } " section
 sourceSets {
  main {
   jniLibs.srcDirs += ['path-to-your-ultimateMRZ-SDK/binaries/android/jniLibs']
   java.srcDirs += ['path-to-your-ultimateMRZ-SDK/java/android']
   assets.srcDirs += ['path-to-your-ultimateMRZ-SDK/assets/models']
  }
 }


}
iOS
On iOS we provide a FAT C++ framework for Xcode. The framework has a single C++ header file which means you can easily write an Obj-C wrapper around it if you want to use Swift language. Please contact us if you want to use the framework with Swift.
The framework is at ultimateMRZ-SDK/binaries/ios/ultimate_mrz-sdk.framework.
Make sure you’re using latest Xcode version. In the next sections we’re using Xcode Version 11.3 (11C29).
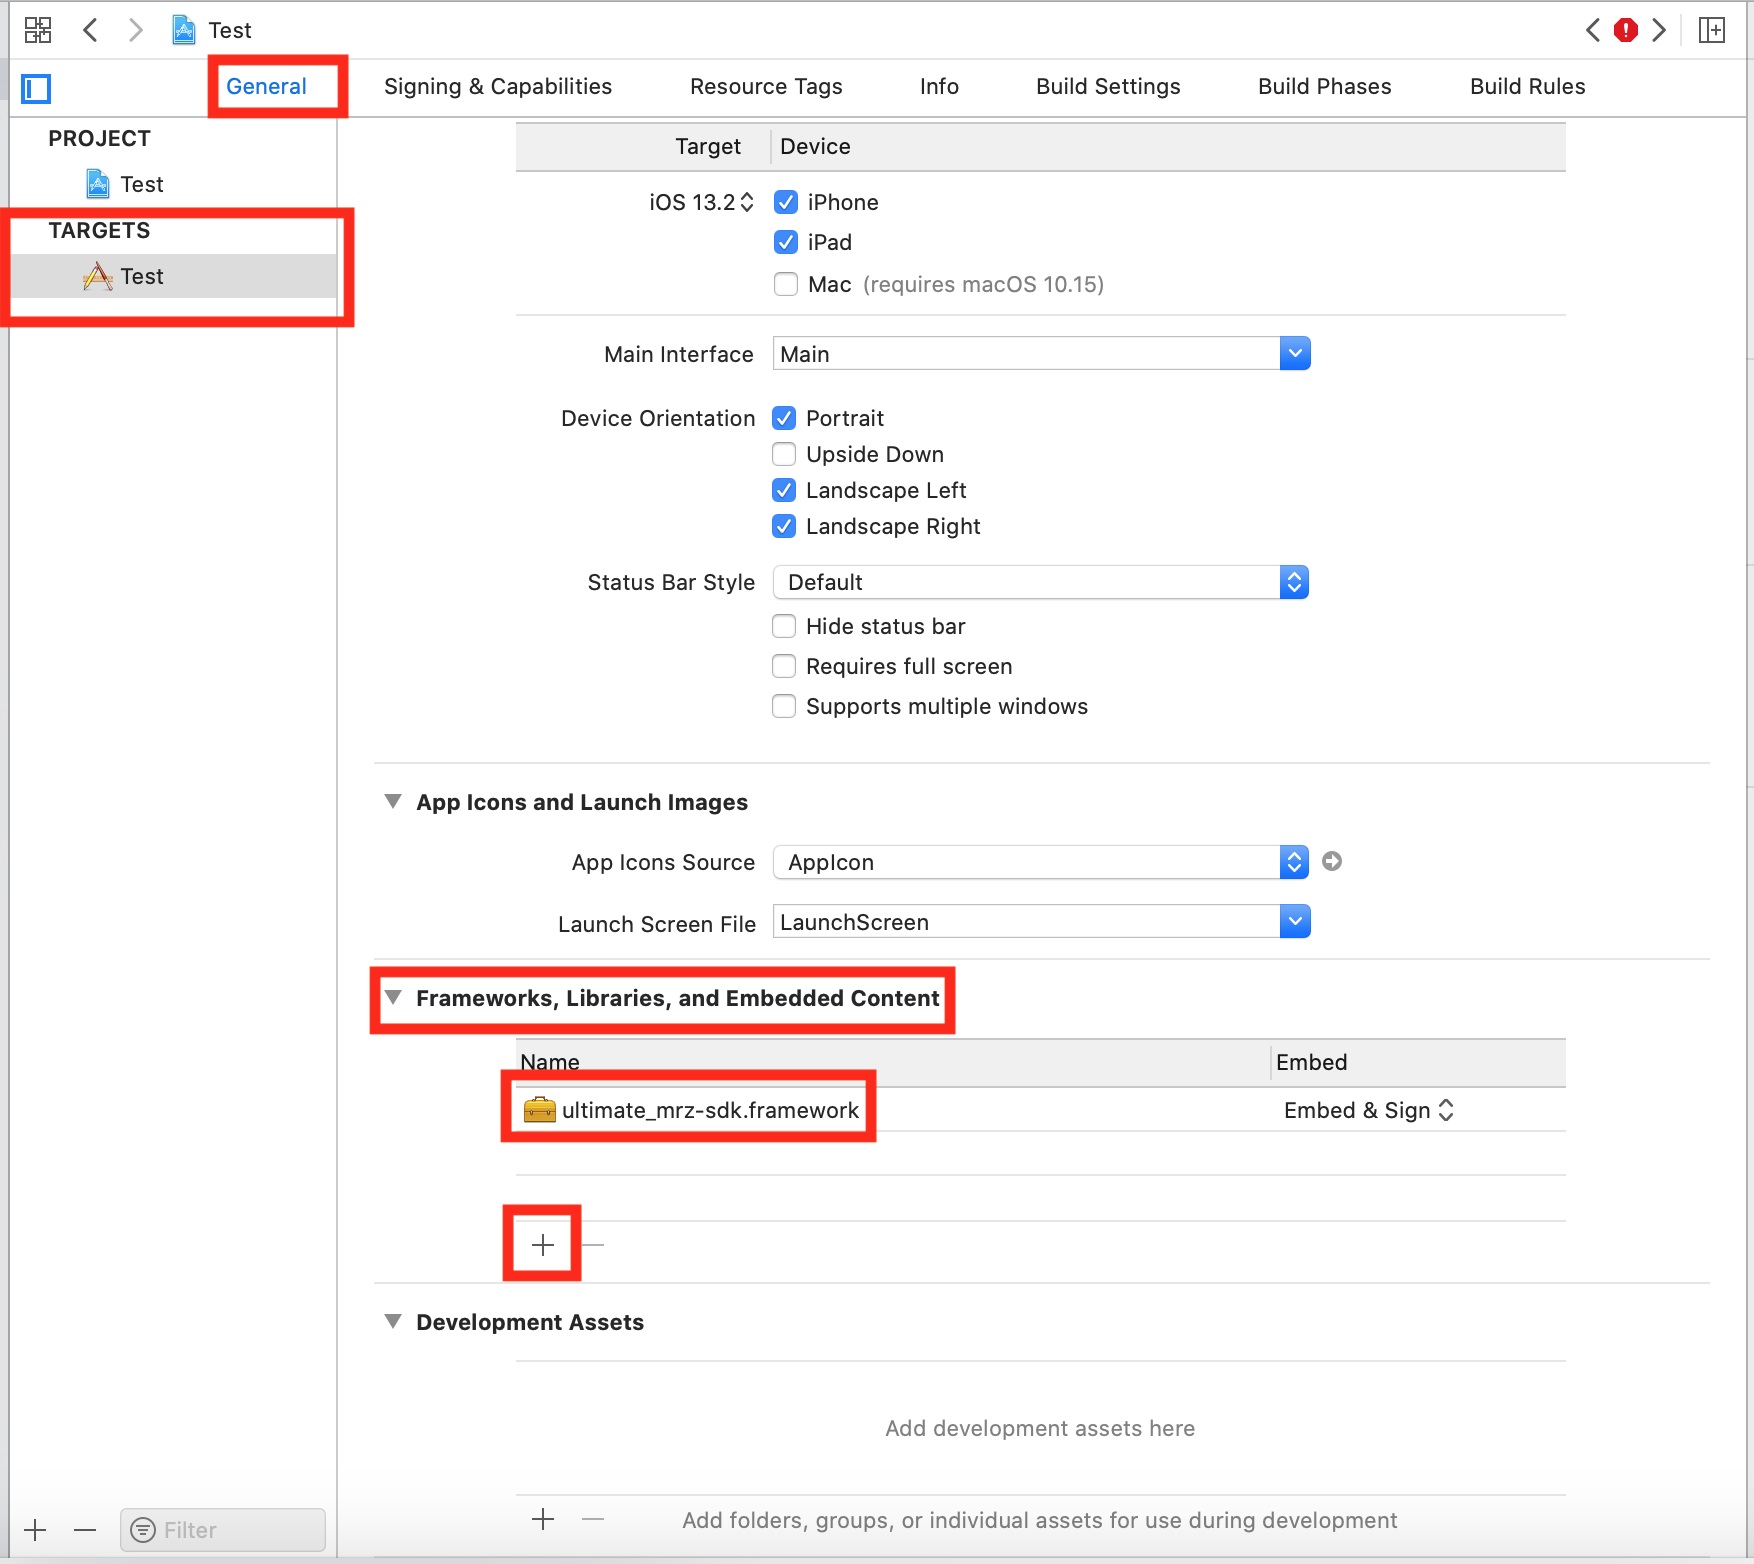
Select your target (let’s say”Test”), select “General” section then, “Framework, Libraries, and Embedded Content” and press “+” to browse to https://github.com/DoubangoTelecom/ultimateMRZ-SDK/tree/master/binaries/ios/ultimate_mrz-sdk.framework to add the framework.
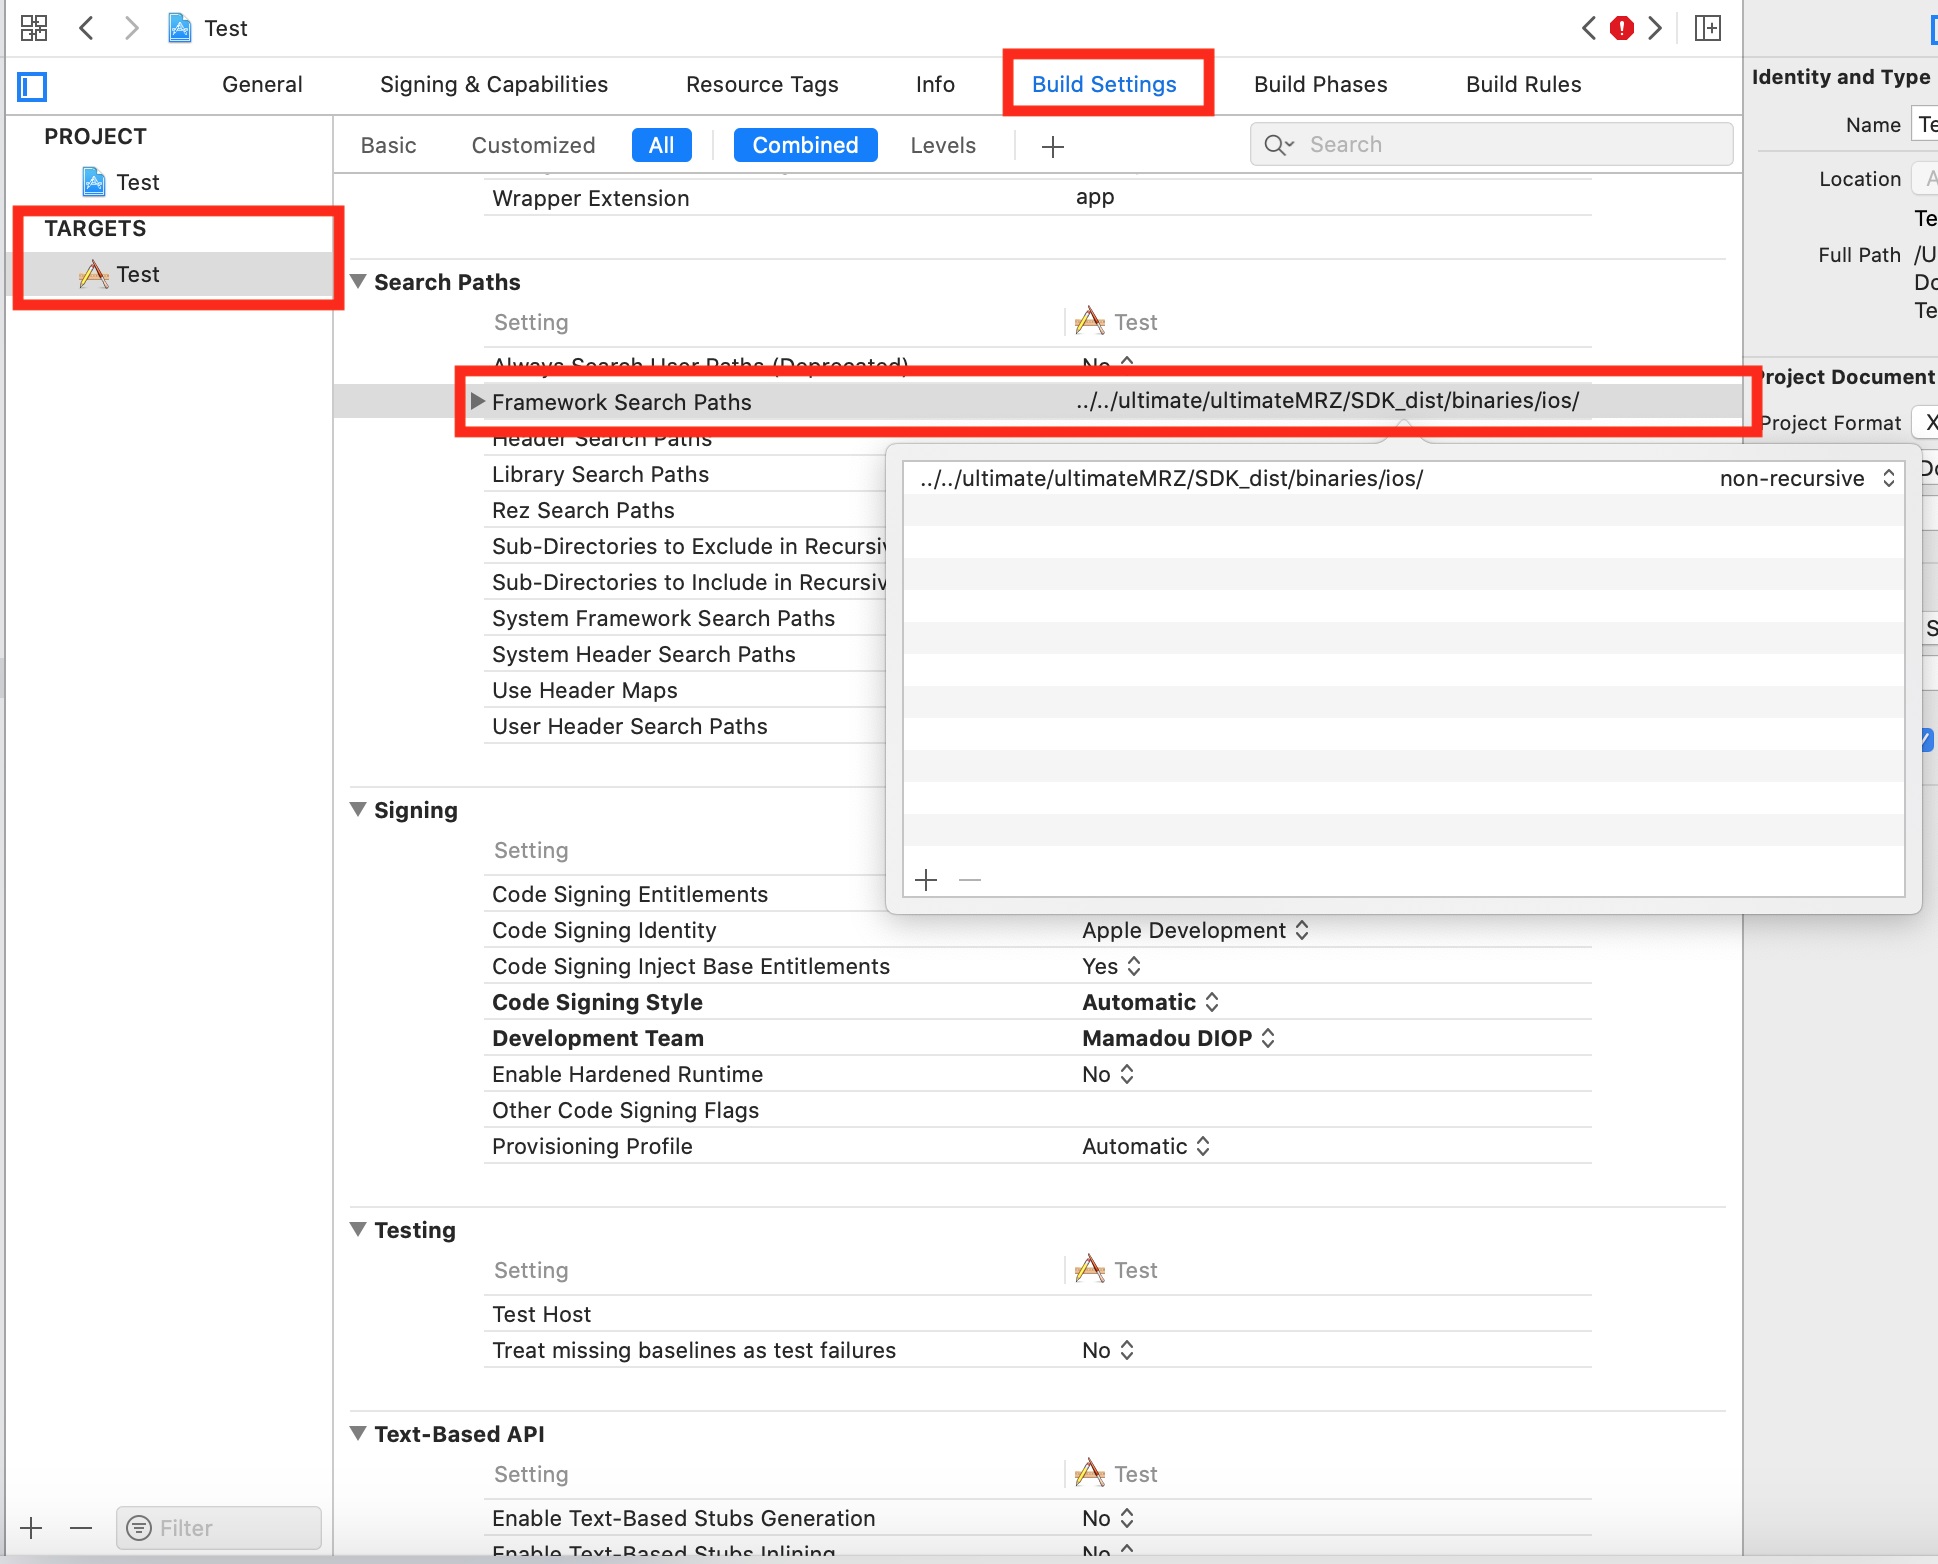
Select your target (let’s say”Test”), select “Build Settings” section then, “Framework Search Paths” and press “+” to add path to the folder containing the framework (should be ultimateMRZ-SDK/binaries/ios)
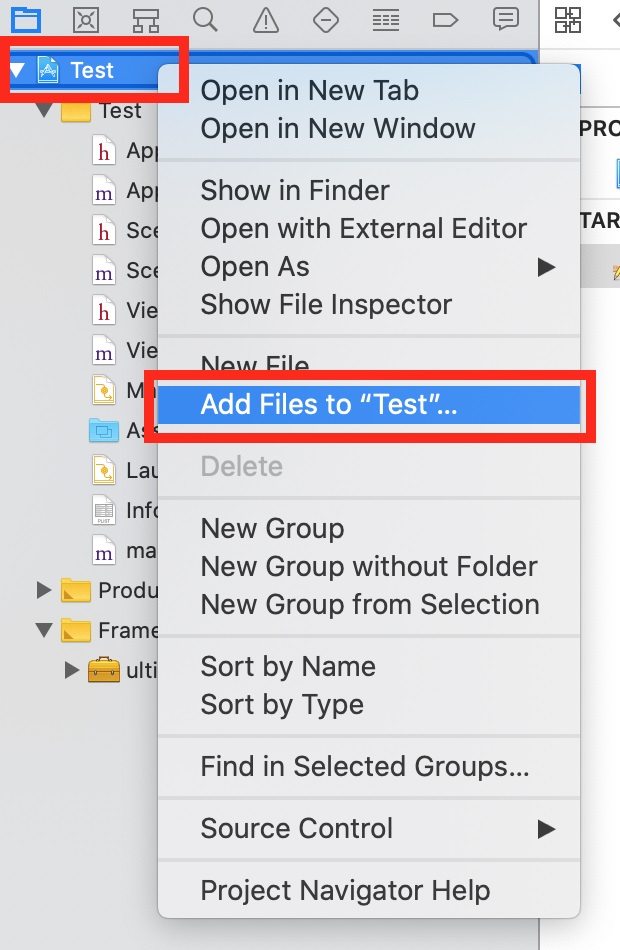
Right click on your project, select “Add Files to…” and browse to “ultimateMRZ-SDK/assets/models” to select models the folder.
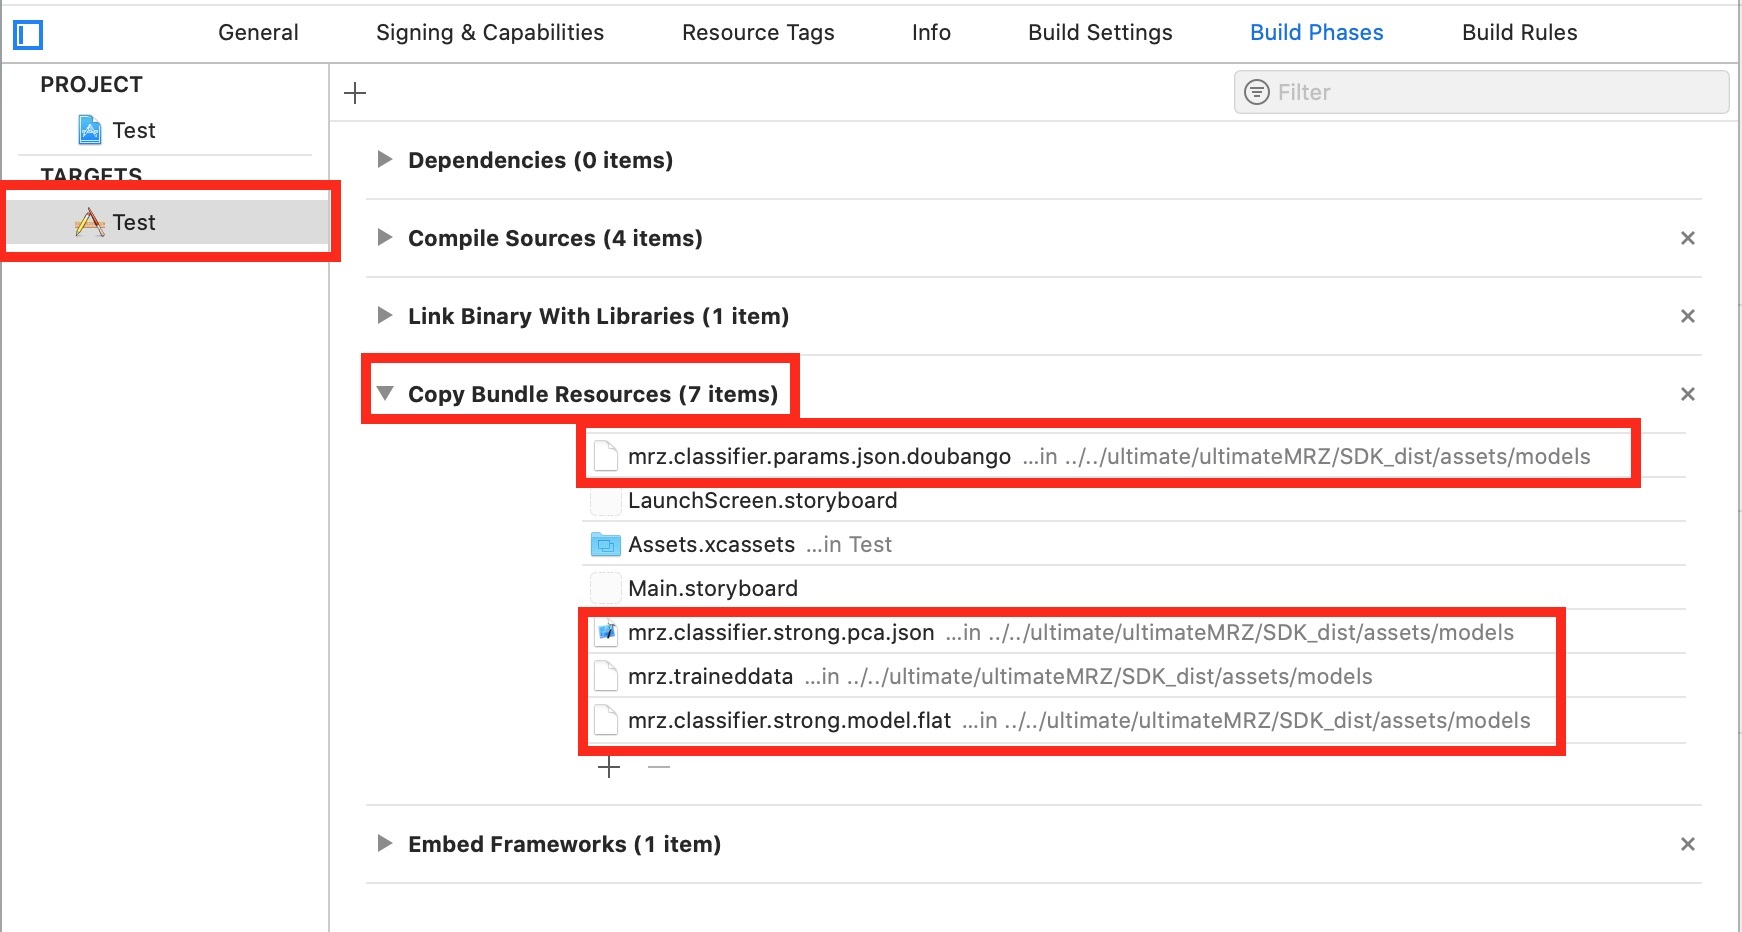
The previous action should add the models and configuration files to the bundle resources:
That’s it.
Raspberry Pi, Linux, Windows and Others
The shared libraries are under “ultimateMRZ-SDK/binaries/**<platform>**”. The header file at “ultimateMRZ-SDK/c++”. You can use any C++ compiler/linker.
Using the API
It’s hard to be lost when you try to use the API as there are only 3 useful functions: init, process and deInit.
The C++ API is defined here.
Android (Java)
import org.doubango.ultimateMrz.Sdk.ULTMRZ_SDK_IMAGE_TYPE;
import org.doubango.ultimateMrz.Sdk.UltMrzSdkEngine;
import org.doubango.ultimateMrz.Sdk.UltMrzSdkResult;

// JSON configuration string
// More info at https://www.doubango.org/SDKs/mrz/docs/Configuration_options.html
final static String CONFIG = "{" +
        "\"debug_level\": \"info\"," +
        "\"debug_write_input_image_enabled\": false," +
        "\"debug_internal_data_path\": \".\"," +
        "" +
        "\"num_threads\": -1," +
        "\"gpgpu_enabled\": true," +
        "\"gpgpu_workload_balancing_enabled\": true," +
        "" +
        "\"segmenter_accuracy\": \"high\"," +
        "\"interpolation\": \"bilinear\"," +
        "\"min_num_lines\": 2," +
        "\"roi\": [0, 0, 0, 0]," +
        "\"min_score\": 0.0" +
"}";

@Override
protected void onCreate(Bundle savedInstanceState) {
        super.onCreate(savedInstanceState);


        // Initialize the engine
        assert UltMrzSdkEngine.init(
                        getAssets(),
                        CONFIG
        ).isOK();
}

// Camera listener: https://developer.android.com/reference/android/media/ImageReader.OnImageAvailableListener
final ImageReader.OnImageAvailableListener mOnImageAvailableListener = new ImageReader.OnImageAvailableListener() {

        @Override
        public void onImageAvailable(ImageReader reader) {
                        try {
                            final Image image = reader.acquireLatestImage();
                            if (image == null) {
                                return;
                            }

                            // MRZ recognition
                            final int exifOrientation = 1; // Normal (landscape) - no rotation
                            final Image.Plane[] planes = image.getPlanes();
                            final UltMrzSdkResult result = UltMrzSdkEngine.process(
                                ULTMRZ_SDK_IMAGE_TYPE.ULTMRZ_SDK_IMAGE_TYPE_YUV420P,
                                planes[0].getBuffer(),
                                planes[1].getBuffer(),
                                planes[2].getBuffer(),
                                image.getWidth(),
                                image.getHeight(),
                                planes[0].getRowStride(),
                                planes[1].getRowStride(),
                                planes[2].getRowStride(),
                                planes[1].getPixelStride(),
                                exifOrientation
                            );
                            assert result.isOK();

                            image.close();

                        } catch (final Exception e) {
                           e.printStackTrace();
                        }
        }
};

@Override
public void onDestroy() {
        // DeInitialize the engine
        assert UltMrzSdkEngine.deInit().isOK();

        super.onDestroy();
}
iOS, Windows, Raspberry Pi and Others (C++)
#include <ultimateMRZ-SDK-API-PUBLIC.h> // C++ API: https://www.doubango.org/SDKs/mrz/docs/cpp-api.html

// JSON configuration string
// More info at https://www.doubango.org/SDKs/mrz/docs/Configuration_options.html
static const char* __jsonConfig =
"{"
"\"debug_level\": \"info\","
"\"debug_write_input_image_enabled\": false,"
"\"debug_internal_data_path\": \".\","
""
"\"num_threads\": -1,"
"\"gpgpu_enabled\": true,"
#if defined(__arm__) || defined(__thumb__) || defined(__TARGET_ARCH_ARM) || defined(__TARGET_ARCH_THUMB) || defined(_ARM) || defined(_M_ARM) || defined(_M_ARMT) || defined(__arm) || defined(__aarch64__)
"\"gpgpu_workload_balancing_enabled\": true,"
#else // Disable GPGPU/CPU work balancing on x86 and enable it on ARM -> https://devtalk.nvidia.com/default/topic/494659/execute-kernels-without-100-cpu-busy-wait-/
"\"gpgpu_workload_balancing_enabled\": false,"
#endif
""
"\"segmenter_accuracy\": \"high\","
"\"interpolation\": \"bilinear\","
"\"min_num_lines\": 2,"
"\"roi\": [0, 0, 0, 0],"
"\"min_score\": 0.0"
"}";

// Local variable
UltMrzSdkResult result(0, "OK", "{}");

// Initialize the engine (should be done once)
ULTMRZ_SDK_ASSERT((result = UltMrzSdkEngine::init(
        __jsonConfig
)).isOK());

// Processing (detection + recognition)
// Call this function for every video frame
const void* imageData = nullptr;
ULTMRZ_SDK_ASSERT((*result_ = UltMrzSdkEngine::process(
                ULTMRZ_SDK_IMAGE_TYPE_RGB24,
                imageData,
                imageWidth,
                imageHeight
        )).isOK());

// DeInit
// Call this function before exiting the app to free the allocate resources
// You must not call process() after calling this function
ULTMRZ_SDK_ASSERT((result = UltMrzSdkEngine::deInit()).isOK());
Again, please check the sample applications for more information on how to use the API.
