Improving the accuracy
The code provided on Github comes with default configuration to make everyone almost happy. You may want to increase the speed our accuracy to match your use case.
Detector
This section explains how to increase the accuracy for the detection layer.
Far away or very small plates
This section explains how to improve accuracy on very small or far away plates.
Region of interest
As explained in the previous sections, the detector expects a 300x300 image as input. Regardless the input size the detector will always downscale it at 300x300 and convert it to RGB_888.
When a plate is far away or very small and the image too large, then downscaling it to 300x300 make such plates almost disappear.
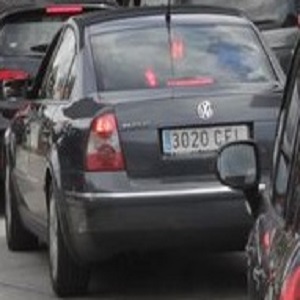
Let’s consider the next 1280x720 image:
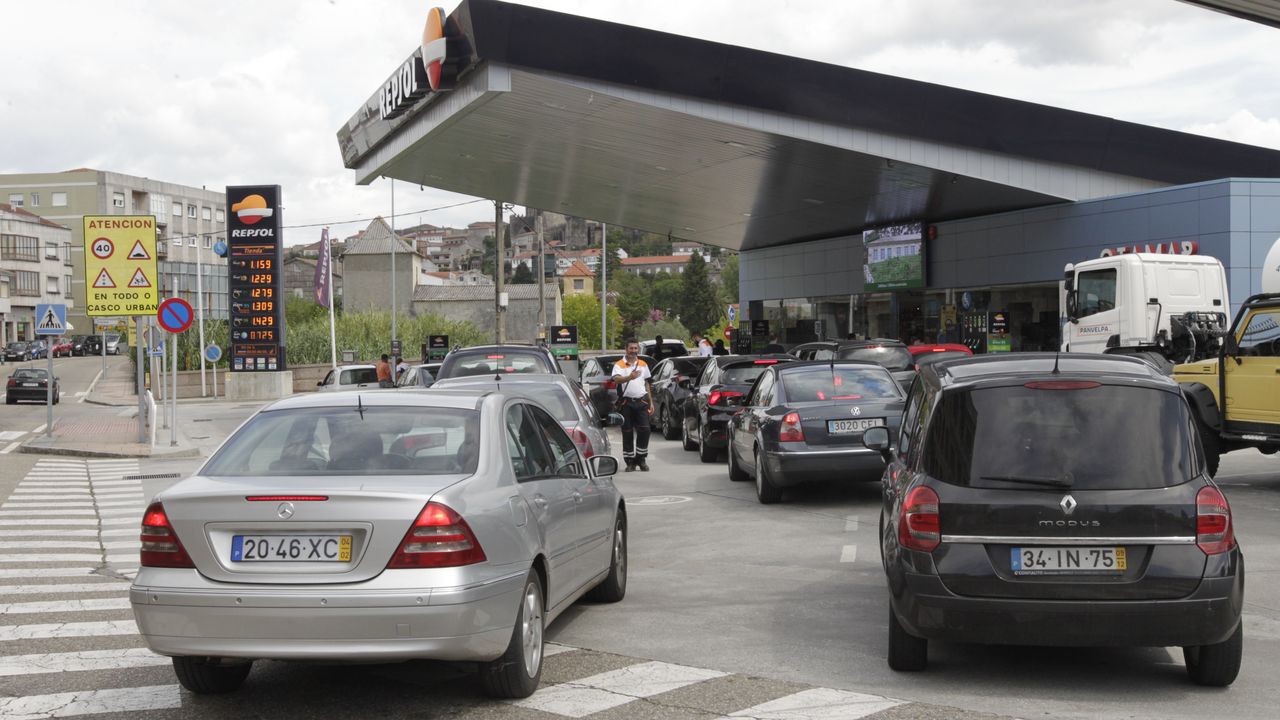
1280x720 image with far away plate
The license plates on the Renault and Mercedes-Benz are correctly detected but not the one on the volkswagen (VW). The issue is that the license plate on the VW is far away or relatively small compared to the image size. Let’s resize the image at 300x300 and see what the CNN have as input:

1280x720 image with far away plate resized at 300x300
We can clearly see that at 300x300 the plate on the VW is undetectable. In fact the issue isn’t that the plate is small in terms of pixels but in percentage relative to the image size. To fix the issue, select a region of interest (see configuration section on how to define a ROI) to make the plate size in percentage higher. Let’s take a 1100x333 ROI:
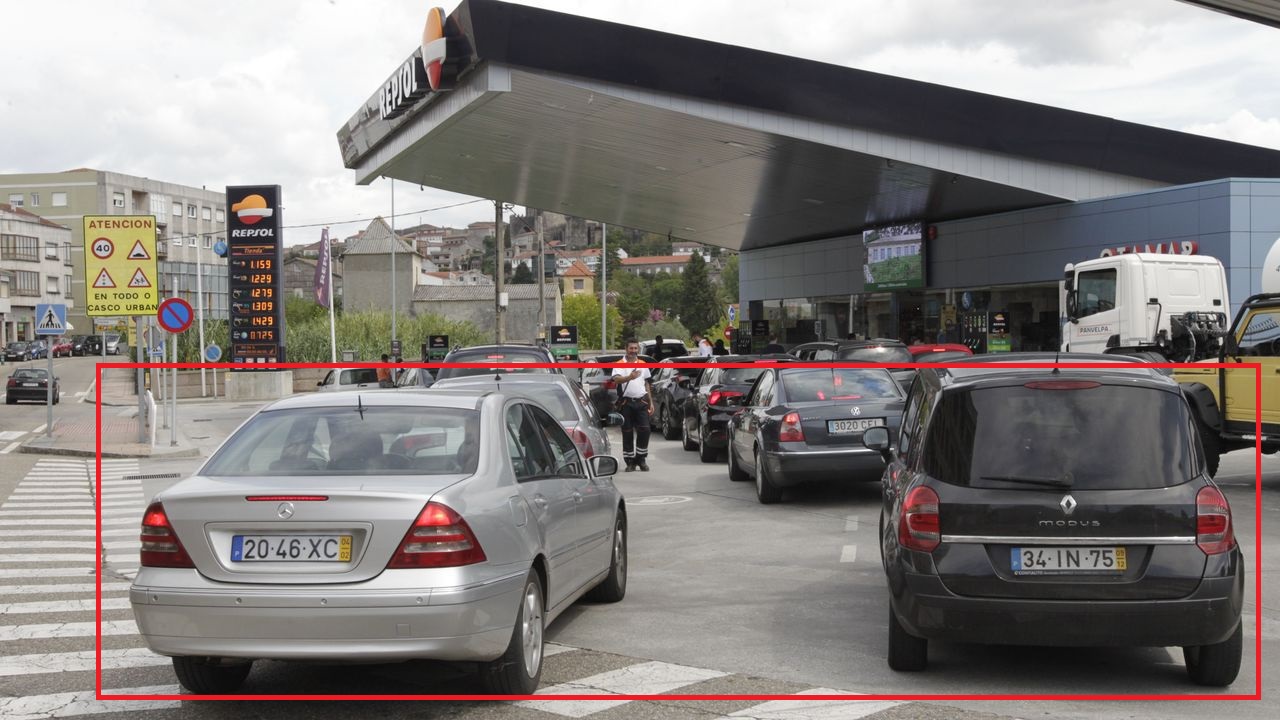
1280x720 image with far away plate with 1100x300 ROI
The 1100x333 ROI defines a region where we expect to have a license plate and ignore everything else (the sky, the buildings…). Let’s crop the ROI:
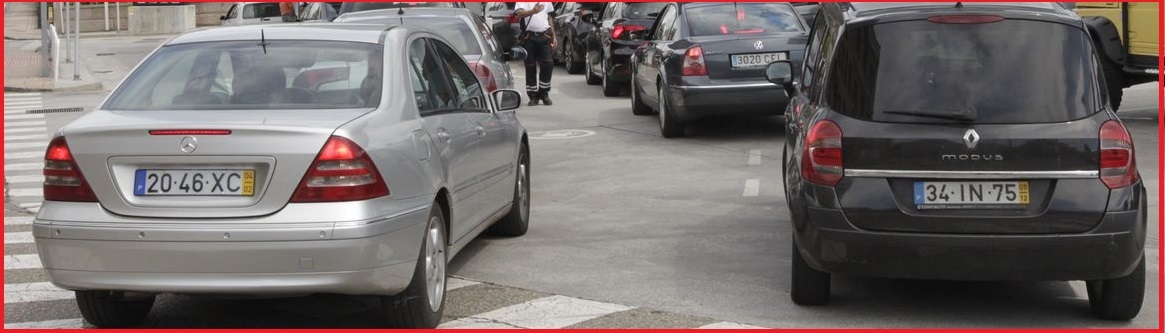
1100x300 ROI cropped from 1280x720 image
Let’s resize the cropped ROI at 300x300:

1100x300 ROI cropped from 1280x720 image and resized at 300x300
Now you can see that the license plate on the VW is clear and can be reliably detected.
Another solution would be detecting the car first which will always work as its size is large relative to the overall image:
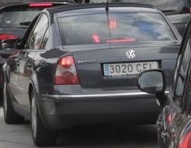
Car detection
Then, resizing the car at 300x300 and detecting the license plate:
Car detection resized at 300x300
All the steps described in this section are automatically done by the SDK when you define a ROI. You don’t need to write a single line of code to crop or resize the input image.
Another elegant way to detect license plates with any size is to enable pyramidal search. See next section for more information.
Pyramidal search
This function was added in version 2.4 and is the recommended way to detect small or far away plates on large images.
We recommend enabling pyramidal search if the video resolution is equal or more than 720p.
More info about pyramidal search could be found here.
Configuration entry: pyramidal_search_enabled.
Prefer 16:9 or 4:3 resolution
Most of the images in the training data are 720p (1280 x 720) in size. As already explained, the input image is always converted to 300x300 size before feeding the neural network. We highly recommend using images with width larger than height. For example, prefer landscape mode instead of portrait.
Golden number
When pyramidal search is enabled a sensitivity value equal to 1.0 is a golden number as it overrides some configuration values to choose the best possible options to significantly improve the detection accuracy.
Up to version 3.1.0 this feature was only available to x86-64 CPUs. Starting 3.2.0 this feature is available to all CPUs.
Configuration entry: pyramidal_search_sensitivity.
Detection score threshold
The configuration section explains how to set the minimum detection score.
If you have too many false-positives, then increase the detection score in order to increase the precision.
If you have too many false-negatives, then decrease the detection score in order to increase the recall.
Matching training data
The training data for the detection predominantly contains license plate mounted on a car. There are very few images of license plates alone. To increase the detection accuracy you should provide images showing both the license plate and the car.
For example, detecting license plate on the next image will be done with the highest accuracy possible (99.99%):
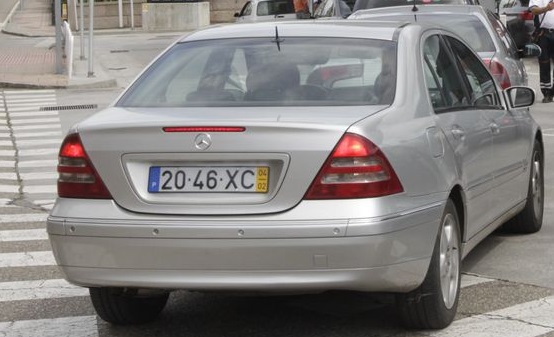
Plate mounted on car
While detecting the license plate on the next image will be done with very low accuracy or even fail:
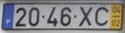
Plate alone
The fact that the training data predominantly contains images showing both the license plate and the car while there are few images with isolated plates is done on purpose. When you’re filming an outdoor scene, then there are many traffic signs or billboards looking very similar to license plates (strong borders with regular text inside). Adding a car as precondition helps get ride of false positives. When the SDK is correctly configured you’ll almost never see false-positives.
Image Enhancement for Night-Vision (IENV) [Detect]
Enabling IENV will improve the accuracy on low contrast images.
Configuration entry: ienv_enabled.
License Plate Country Identification (LPCI)
There is no secret here, just make sure the plate isn’t skewed or slanted and is large enough.
More information on License Plate Country Identification (LPCI) could be found here.
Vehicle Color Recognition (VCR)
This function is very sensitive to the image quality.
More information on Vehicle Color Recognition (VCR) could be found here.
Fuse
The SDK supports White, Silver, Gray and many other colors but not LightSilver and DarkSilver.
- When the confidence score for the Top #1 result is less than a certain threshold (80% recommended) then, you can combine the Top #2 to form a new color.
You can assume the color to be LightSilver when the Top #2 is “White, Silver” and the sum of the confidence scores is higher than a certain threshold.
You can assume the color to be DarkSilver when the Top #2 is “Gray, Silver” and the sum of the confidence scores is higher than a certain threshold.
The Java code would look like this:
final AlprUtils.Car.Color colorObj0 = car.getColors().get(0);
if (colorObj0.getConfidence() >= 80) {
    color = colorObj0.getName();
}
else if (car.getColors().size() >= 2) {
    final AlprUtils.Car.Color colorObj1 = car.getColors().get(1);
    final String colorMix = colorObj0.getName() + "/" + colorObj1.getName();
    float confidence = colorObj0.getConfidence();
    if ("white/silver,silver/white,gray/silver,silver/gray".indexOf(colorMix) != -1) {
        confidence += colorObj1.getConfidence();
    }
    if (confidence >= 80) {
        color = (colorMix.indexOf("white") == -1) ? "DarkSilver" : "LightSilver";
    }
}
Gamma correction
The gamma coefficient (1/G) is used to enhance the car color before applying VCR classification. This value is defined using JSON config entry klass_vcr_gamma. More information on gamma correction could be found at https://en.wikipedia.org/wiki/Gamma_correction.
Values higher than 1.0f mean lighter and lower than 1.0f mean darker.
Value equal to 1.0f means bypass gamma correction operation.
Default value is equal to 1.5f.
Input |
Gamma |
|---|---|

|
0.5 (darker) |

|
0.75 (darker) |

|
1.0 (original image) |

|
1.5 (lighter) |

|
2.0 (lighter) |
Image Enhancement for Night-Vision (IENV) [VCR]
Enabling IENV will improve the accuracy on low contrast images.
Configuration entry: ienv_enabled.
Vehicle Make Model Recognition (VMMR)
The VMMR function uses classification and returns the top-5. The dataset contains more than 15k models.
Accurately retrieving the Make, Model and Year from an image is very challenging when 2 models look alike. For example, it’s very difficult to find differences between the Mercedes-Benz Class C Year 2013 and Mercedes-Benz Class C Year 2011. These two models will most probably appear in the top-5 and it’s hard to choose which one is correct. In order to help choose the right model we use fuse and defuse technique.
Fuse and defuse
See above why fuse and defuse technique is needed.
Let’s say you try with the next image:

You’ll have the next top-5 results from the VCR classifier:
Rank |
Make |
Model |
Year |
Score |
|---|---|---|---|---|
#1 |
renault |
clio |
2012 |
45.00% |
#2 |
renault |
clio |
2019 |
36.00% |
#3 |
renault |
grand scenic |
2004 |
0.87% |
#4 |
renault |
clio |
2005 |
0.80% |
#5 |
renault |
grand scenic |
2013 |
0.27% |
Please note that we support more than 15k models but only returning the top-5 and the sum of all scores is always equal to 100%.
If you check the top-1 result (“renault, clio, 2012”) you see that the confidence is low (45.00%). But, if you check the top-5 results you understand that the make is clearly “renault” and the model “clio”. This is why fuse and defuse technique is needed to improve the top-1 score.
After fuse and defuse technique is applied to the top-5 result, you’ll have the following:
Make |
Score |
|---|---|
renault |
82.94% |
Model |
Score |
|---|---|
clio |
81.80% |
grand scenic |
1.14% |
Now we clearly see that the make (82.94%) and model (81.80%) are predicted with high score. For the year, we can assume it’s the same as top-1 (2012).
Please check the source for more information on how the fuse and defuse technique is implemented.
In C++ the code would look like this:
std::map<std::string, float> makes;
std::map<std::string, int> occurrences;
// Fuse makes
for (const auto& it : resultsVMMR) {
        makes[it.make] += it.score;
        occurrences[it.make] += 1;
}
// Find make with highest confidence
auto bestMake = std::max_element(makes.begin(), makes.end(), [](const std::pair<std::string, float>& p1, const std::pair<std::string, float>& p2) {
        return p1.second < p2.second;
});
// Model fusion
if (bestMake->second >= VMMR_MIN_CONFIDENCE || (occurrences[bestMake->first] >= VMMR_FUSE_DEFUSE_MIN_OCCURRENCES && bestMake->second >= VMMR_FUSE_DEFUSE_MIN_CONFIDENCE)) {
        make = bestMake->first;

        // Fuse models
        std::map<std::string, float> models;
        for (const auto& it : resultsVMMR) {
                if (make == it.make) {
                        models[it.model] += it.score;
                }
        }
        // Find model with highest confidence
        auto bestModel = std::max_element(models.begin(), models.end(), [](const std::pair<std::string, float>& p1, const std::pair<std::string, float>& p2) {
                return p1.second < p2.second;
        });
        model = bestModel->first;
}
Image Enhancement for Night-Vision (IENV)[VMMR]
Enabling IENV will improve the accuracy on low contrast images.
Configuration entry: ienv_enabled.
License Plate Recognition (LPR)
This section explains how to increase the accuracy for the recognizer layer.
Adding rectification layer
When the license plates are highly distorted (skewed and/or slanted) you’ll need to activate the rectification layer to remove the distortion. The configuration section explains how to activate the rectification layer.
Check the section about rectification for more info about this feature.
Recognition score threshold
The configuration section explains how to set the minimum recognition score.
If you have too many false-positives, then increase the detection score in order to increase the precision.
If you have too many false-negatives, then decrease the detection score in order to increase the recall.
Restrictive score type
The configuration section explains the different supported score types: “min”, “mean”, “median”, “max” and “minmax”.
The “min” score type is the more restrictive one as it ensures that every character on the license plate have at least the minimum target score.
The “max” score type is the less restrictive one as it only ensures that a least one of the characters on the license plate have the minimum target score.
The “median” score type is a good trade-off between the “min” and “max” types.
We recommend using “min” score type. See the configuration section for more info on how to set the score type.
Image Enhancement for Night-Vision (IENV) [LPR]
Enabling IENV will improve the accuracy on low contrast images.
Configuration entry: ienv_enabled.
